Plus 2.X:Input
This case will help you immerse yourself deeper into WUFI®plus. After having performed and understood it you will be a WUFI® expert! Like the first (easier) case, this case is mostly built up following the navigation tree.
This case is about modelling a house (like done in the first example) with an building attachment (used as fitness studio). As it is pretty complicated and complex small movie sections come along with each chapter.
It begins quite similar to our first example, so the first chapters are very much the same.
Information and setting of framework conditions (STEP one)
Proceed like explained in STEP one in the first case.
Definition of the climatic Conditions (STEP two)
Again we want to use the predefined climate of Holzkirchen, and also to create an adequate soil climate. Read STEP two of the first case on further information on how to proceed.
Generating of Building Geometry (STEP three)
Like we did before we want to use the Building Wizard to create our building. But additionally a building extension (for a fitness studio) is to be added to the house using vertices.
With the Building Wizard
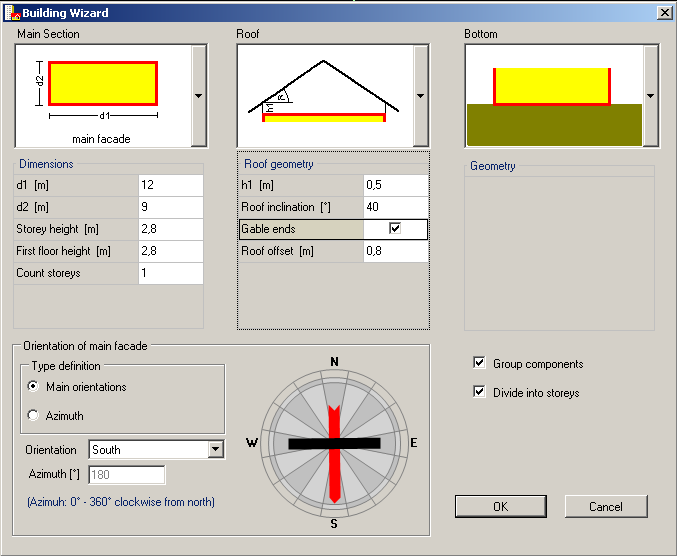
Again we assume a simple case with one heated slab-on-ground zone and an inclined unheated attic. Just make the input you can see below for you building in the Building Wizard.
Using vertices
The simple building created with the Building Wizard shall be expanded. The building extension will serve as fitness studio. The readily expanded building should look like the one shown in Figure 6.
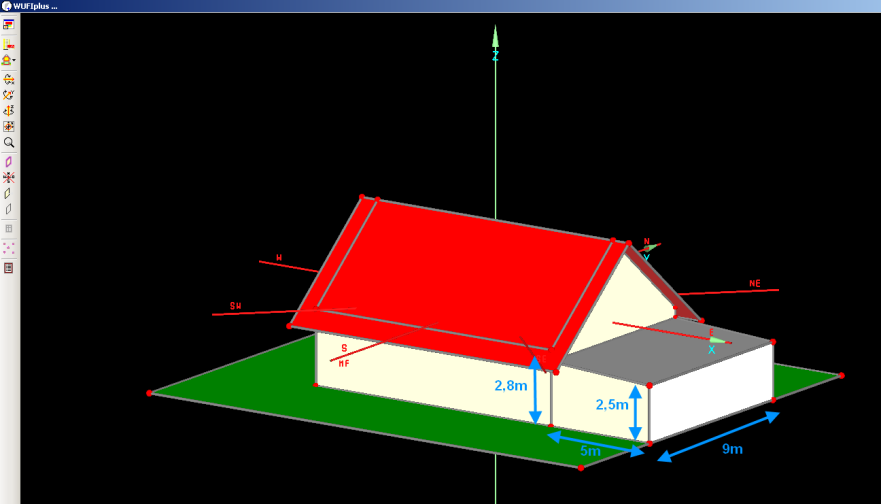
Creating it you need to work with vertices. For more information on this topic, click here.
By copying and moving preexisting vertices and components and by creating new vertices and components, any desired building geometry can be generated. Of course there are several possible procedures to create the desired building extension.
One possible way to proceed is shown in this MOVIE
Click HERE to watch another movie that shows you how to use the 3D tools.
Windows (STEP four)
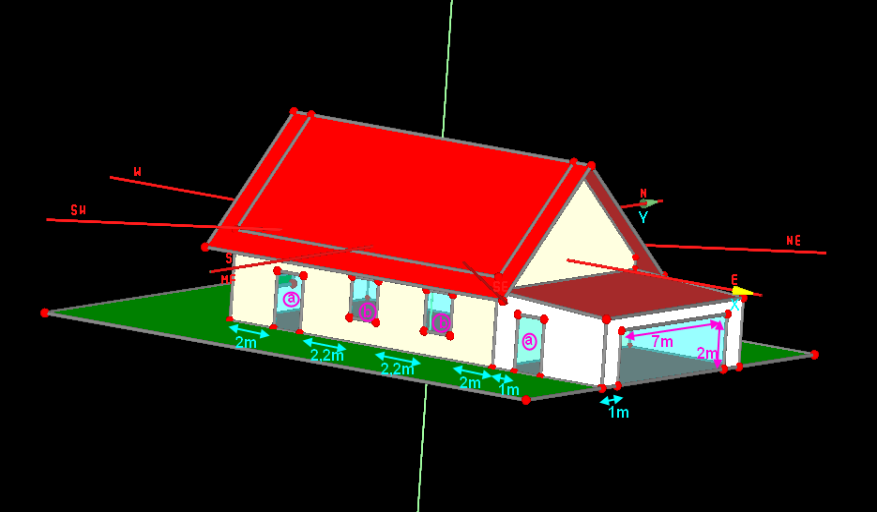
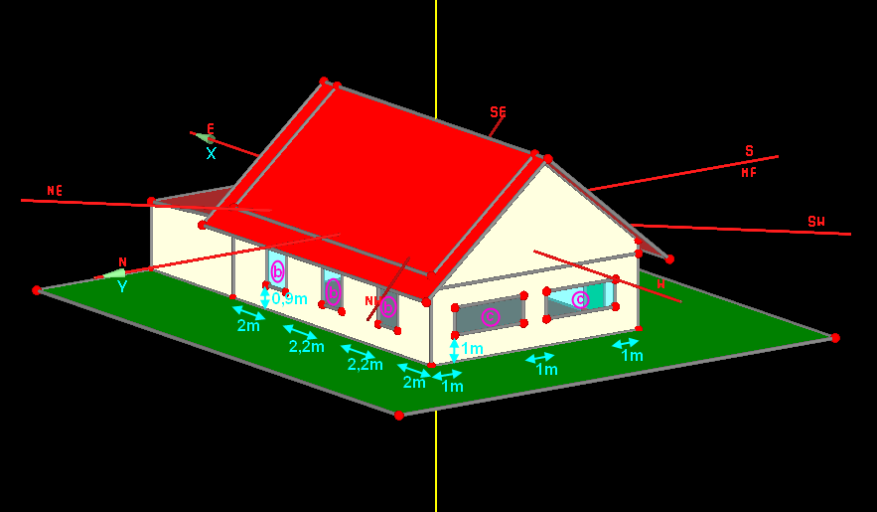
Windows are necessary as well. The pictures below show you how windows should be placed along the walls. Measurements are
| WINDOW | length [m] | height[m] |
| a | 1,2 | 2,1 |
| b | 1,2 | 1,5 |
| c | 3 | 1 |
Window type b is always 0.9 m above the ground.
Try to get the windows right yourself. If you need help doing it, consult the chapter on windows.
TIP: Never forget to check whether the component is viewed from inside or outside while you insert the windows.
The movie below shows you how to place the windows in the right way. WINDOWS-MOVIE
Creation and assigning of the zones( STEP five)
The geometry of the building is now complete. The next necessary (and highly important) step is to generate appropriate zones for the building and to assign them to the respective components. This is important for our building as there are two different ways of utilization in our building; one part of it is used as living space, the other as fitness studio. Therefore the upcoming loads and requirements concerning heating, cooling, ventilation and humidification etc. vary greatly. This makes it necessary to distinguish between the two different sections in order to get reasonable calculation results. This is done by creating two different heated zones. The task of assigning the right zones to components is quite complex as a lot of tools and functions of WUFI®plus can (or must) be used to succeed.
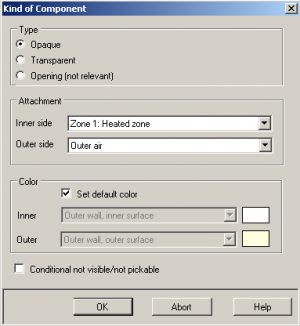
In this example we started creating the building and are assigning the zones in the next step because it is clearer in terms of structure. However these two can be combined. Just assign the right zone to a component in the Properties-Window that pops up each time a new component is created.
Basically, what we need to do concerning our building is to:
- create a second heated zone (for the fitness studio): this is done either using the zones button in the Visualization Box or under the heated zones entry in the Navigation Tree. It should be named significantly for clarity.
- check the orientation and attachment of the components:A component has an inner and an outer side. This is determined using the normal vector. The normal vector always points OUT of the OUTER side of a component. Its orientation can be changed easily by selecting the respective component, right-clicking and choosing "Change orientation inner <-> outer". Each side (inner and outer) needs an attachment, i.e. you need to specify the conditions on each side of it. There are two ways of changing the attachment. Either in the Visualization Box by selecting a component, right clicking and opening its Properties window or under the tab General in the components entry in the Navigation Tree. In our case all walls are outer walls but for the wall between building and building attachment. All outer walls get "outer climate" or "ground" (for the bottom plates) attached to their outer and the suiting zone to their inner side. The wall separating building and building attachment gets the suiting zone attached to each side of it. This wall was generated using the building wizard and "group components" was checked. This had the effect that all outer walls of the building were grouped together as one component. As there is specific input for this partition wall it needs to be ungrouped, i.e. made an independent component. Select it, right-click onto it and choose "ungroup" -> "ungroup main component". After doing this, check the normal check the normal vector of this component and assign the right zone to each side of it.
There are other tools to help you assigning the right attachment.
- the Zones button:
 , by clicking on it already existing zones can be renamed and new ones can be created, by holding the mouse on that button, individual zones (or the whole building) can be selected with the effect that only the components belonging to the selected zone are shown in the Visualization Box. This is really useful in order to check which zone is complete, whether all components are attached to the right zone.
 - This leads to the next point: The partition wall has one zone assigned to each side of it. But what zone does it belong to? This question is answered easily: A component always belongs to the zone that is assigned to its INNER side (that is of course determined by the normal vector). This component can be found under the respective zone's entry in the Tree. However the partition ("belonging" to one zone) of course adjoins other zone, too. Now there is the possibility to decide whether only components defined in the according zone or all components adjoining the zone can be seen if single zones are viewed (using the zones button...see above) in the Visualization Box. This can be done by clicking the Options Button
 under "View".
 - Conditional not visible/pickable:
 This Button allows to make a component conditionally not visible/pickable for example in order to make components lying behind accessible. This is for example interesting in case of the partition wall. It can't be selected as it is hidden by other walls. To reach it, on of the outer walls hiding it, needs to be made "conditional not visible/pickable". In order to use this button for a component, i.e make a component not visible AND not pickable at the same time it is important to check mark the Option "conditionally not visible/pickable" in this component's Properties. (The difference to the "transparent/opaque" button is, that after clicking on this button the component is neither visible nor pickable whereas it is still pickable if only the view is switched from opaque to transparent.) To make it visible and pickable again, just click the button again.
 - Colors: For more clarity components are viewed in different colors. There are default colors for components. They can be found (and altered) clicking the Options Button
 . If you don't want to work with default colors, you can set your own colors for each component by opening its Properties (selecting the component, right-clicking), removing the check-mark from "use default colors" and choosing the desired color for each side of it.
After all this information watch the following movie. It shows step by step how the assigning of the appropriate zones to the components is carried out and also gives a good overview on all the tools and functions that help you do this.
Zone 2 was created by you, so as WUFI®plus does not calculate its net volume automatically you need to do it manually. You can use the calculator and some two point operations to succeed. Find out the distances between two point using the "show distance" command and then calculate the volume. The right net volume for the fitness studio is 119,25 m³.
Next assign "outer climate" as an optional climate to "Attached Zone 1: Unheated Attic"
Assigning of the constructions (STEP six)
Remember how we assigned constructions to components in the first (easy case). This time it's getting a bit more difficult and the knowledge you acquired in the first case is essential for this one.
Zone 1: the Residential Home
Walls and ceiling
In essentials we want to assign the same constructions to the components. Again he construction of exterior walls and partition wall is to be "Lightweight Timber framed Wall". Choose "Flat Roof #1" for the ceiling. For more information on how to do this consult STEP four: Definition of the Components. of the first case.
Additionally for the three exterior walls of the residential house some other values must be altered:
- Alter the numerical grid: The numerical grid of a component can be altered in "Assembly" by clicking the "Edit Button. Numerical Grid can be coarse, medium, and fine. If coarse grid is chosen, calculation time will be kept low, if fine grid is chosen results will be more accurate but the calculation will take longer. In this case we want to choose fine grid for our calculation.
- Set appropriate Absorption/Emission Coefficients: You need to specify values for absorption and emission of the outer surface. . These factors are used to calculate the emitted and absorbed radiation of the outer surface. If there are no user defined values available you can select predefined values from a list with typical exterior surfaces. Go to "Surface" --> "Thermal" to alter values for "Absorption/Emission (exterior surface)" In our case we are going to select "Stucco, normal bright".
- Retain calculation results for the component: If you check-mark "Retain calculation results" under "Report: Data&Results" more detailed results concerning this component are retained. Read more about it here.
Watch the MOVIE to see how these three changes are made.
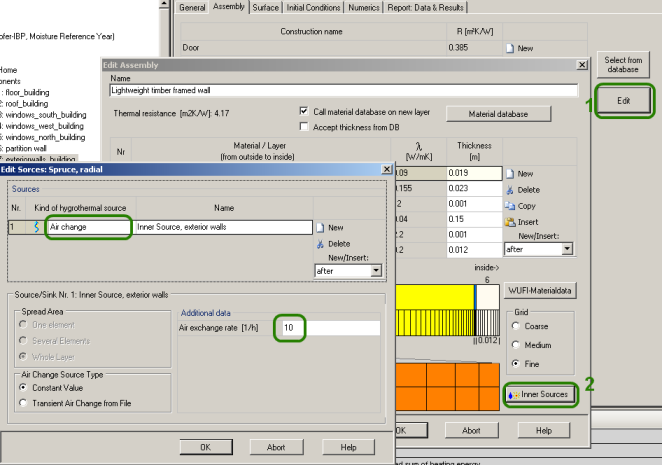
Next, input for an inner source has to be made for the exterior walls. Heat, moisture and air change that occur inside a component can be included in the calculation as an internal source. Just click on "Inner source" in the "Edit Assembly" window. For this case an air change is to be established. Air change means that air from the outside flows through one layer of the component, so we create a facing with air space. Input the following data:
Bottom Plate
Remember how we assigned a construction to the bottom plate in the first case. This time the same assembly is going to be used but are going to save it to the database and then we are going to select it from the database. This procedure may be a bit more complicated but makes a lot more sense than the other. The advantage is, that after saving an assembly to the database it can be reused any time and the same input doesn't need to be made again and again.
Beginning from the outside the Bottom Plate consists of the following materials (that are already saved to the database):
| 1 | XPS Surface Skin (heat cond.: 0,03 W/mK) | 0,01m |
| 2 | XPS Core (heat cond.: 0,03 W/mK) | 0,14m |
| 3 | XPS Surface Skin (heat cond.: 0,03 W/mK) | 0,01m |
| 4 | Concrete, w/c=0,5 | 0,26m |
| 5 | PVC Roof Membrane | 0,001m |
| 6 | EPS (heat cond.:0,04 W/mK – density: 30kg/m³) | 0,1 |
| 7 | Gypsum Fiberboard | 0,025m |
Watch the MOVIE to learn how to create your own assemblies and how to save them to the database.
After allocating a construction to the Bottom Plate don't forget to assign the optional soil climate (that you created before) to it.
Door and Windows
- DOOR: So far there is a French window. We want to convert this transparent component into an opaque one in order to create a door. There are two ways to do this. Either select the component in the Visualization Box, right-click, open its properties and change transparent to opaque or select it in the Navigation Tree and alter its type under "General". The "door" is an opaque component now, so it needs an assembly assigned to it. Create a new assembly for the door that is made of one single layer. Therefore a new material (wood) must be created.
The data of it is:
Basic values:
| Bulk density [kg/m³] | 650 |
| Porosity [m³/m³] | 0,47 |
| Spec. heat capacity [J/kgK] | 1500 |
| Thermal conductivity [W/mK] | 0,13 |
| Water vapour diffusion resistance factor [-] | 200 |
| Typical built-in moisture [kg/m³] | 98 |
Optional Data:
| Moisture storage function | |||||
|---|---|---|---|---|---|
| RH [-] | Water Content [kg/m³] | ||||
| 0 | 0 | ||||
| 0,5 | 52 | ||||
| 0,8 | 98 | ||||
| 0,9 | 143 | ||||
| 0,97 | 190 | ||||
| 1 | 370 | ||||
| Thermal Conductivity, moisture-dependent | |||||
|---|---|---|---|---|---|
| Water Content [kg/m³] | Thermal Conductivity [W/mK] | ||||
| 0 | 0,13 | ||||
| 470 | 0,25 | ||||
| Check mark "Generate" and enter 1,3 for Thermal Conductivity Supplement [%/M.-%]. | |||||
| Water vapour diffusion resistance factor, moisture-dependent | |||||
|---|---|---|---|---|---|
| RH [-] | μ-Value [kg/m³] | ||||
| 0 | 200 | ||||
| 0,25 | 180 | ||||
| 0,5 | 65 | ||||
| 0,6 | 45 | ||||
| 0,7 | 30 | ||||
| 0,8 | 17 | ||||
| 0,86 | 13 | ||||
| 0,9 | 10 | ||||
| 0,1 | 10 | ||||
Then create a new assembly, that has only one layer (5cm of your newly created wood) and apply it for both doors.
Watch the MOVIE where all of this is shown step by step.
Also set absorption and emission coefficients. Choose "Wood (spruce):painted brown" from the list in Surface-->Thermal.
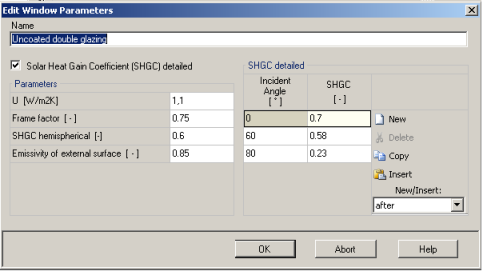
- WINDOWS: The windows need to be given an appropriate window type. There are some predefined window types in the window database already. "Uncoated double glazing" is chosen for our windows. However, some values don't fit and need to be altered. There are several ways of proceeding. First a new, appropriate, window type could be saved to the database. Most of the time this is the most reasonable way, because this new type can be reused at any time (because it's saved in the database for good). However in this example we choose a second way of proceeding, we just alter the parameters of uncoated double glazing. These altered parameters are just used in this single project.
So select uncoated double glazing in your windows list, then click on "edit" and alter the parameters like shown below.
Zone 2: the Fitness Studio
Walls and ceiling
Again assign "Lightweight timber framed wall" to the exterior walls. Inner sources and grid were altered before and are applied for the exterior walls of the Fitness Studio, too. Again set appropriate absorption/emission coefficients (Stucco normal bright).
Additionally the three exterior walls of the Fitness Studio should be grouped together (advisable: do this before assigning an assembly to them, saves you some work. Select all components that shall be grouped (using ctrl) right click and choose "group".
"Flat Roof #1" is chosen for the ceiling again.
Bottom Plate
Select the "Bottom Plate" you defined before as construction. After this don't forget to assign the optional soil climate (that you created before) to it.
Door and Windows
- DOOR:Convert the French Window into an opaque component like described above. Select the material for the door you created before and again choose "Wood(spruce):painted brown" for absorption/emission coefficient.
- WINDOWS: Again choose "Uncoated double glazing". Values were altered for the "Uncoated double glazing" before and are automatically applied for the window of the Fitness Studio. For the window wall a solar protection device needs to be established. Go to "Solar Protection", subsection:"Solar Protection" and generate a new solar protection that:
- is called Sun Blind
- holds off 30 percent of impacting radiation
- has a thermal resistance supplement of 0,2
- is activated if a radiation limit of 500 W/m² is reached.
Try for yourself and watch the movie if you are stuck or to compare your input. To read more about entering and changing input concerning windows, click here
At this point you should be able to start the calculation for the first time. If there are still error messages in your Status and Results Box, double click onto them and try to resolve them.
Inner Loads (STEP seven)
Inner loads produce heat, carbon dioxide and moisture inside the building. Inner loads can be people (or technical devices) inside the building. As the tow zones of our building are used in different ways it is important to differentiate between inner loads of the Residential Home and the Fitness Studio. We assume that a family is living in the house and that they are running a public fitness studio in the building attachment. In this example we focus on the people in the building and neglect any technical devices that might produce inner loads. Try to get the periods and day profiles right for yourself (Help). Use inner sources from the database with help of the "Calculator inner sources" and by saving an own source to the database for the sportsmen. If there are any problems (or if you want to check your findings), watch the movie which guides you step-by-step through the task.
Zone 1: The Residential Home
The family living in the house is four-headed (two adults, one 6-year old, one 15-year old). It is assumed that all four of them leave the house at 8am and come back at 4pm during weekdays. At home they are relaxed and not doing any work. At weekends it is assumed that they are at home all the time. From June 24th to August 2nd the family is on holiday.
Zone 2: The Fitness Studio
The Fitness Studio's open all week from 8am to 8pm. During the family's holiday (June 24th to August 2nd) it's closed. During opening hours there's always a member of staff working (not working out) in the Fitness Studio. The average numbers of people doing their work out are:
| time | number of sportsmen |
| 8am to 10am | 6 |
| 10 am to 3pm | 9 |
| 3pm to 8pm | 12 |
It is assumed that one sportsman produces the following loads:
| Moisture [g/h] | 250 |
| Heat convective [W] | 300 |
| Heat radiant [W] | 90 |
| CO2 [g/h] | 120 |
Adjust the clothing factor from 0,7 to 0,5. Altering the clothing factor allows an assessment of the PMV and PPD values that are calculated automatically.
In reality technical devices like computers, inhabitants showering or cooking have to be included in the calculation as well.
Design Conditions (STEP eight)
In this step you have to verify the design conditions, i.e. the desired values for temperature, relative Humidity, Ventilation and CO2.
Preliminary it is important to know that for indoor climate conditions two basic requirements are necessary:
- a schedule to control working hours of heating, cooling, de-/humidification or ventilation system and
- a definition of capacities of these systems. (STEP ten Initiation of HVAC Systems or HVAC )
Read more on design conditions in the respective chapter.
As there are two differently used zones in our building of course the design conditions are different as well.
Zone 1: The Residential Home
In the residential part of the building values for temperature and ventilation need to be established. Input for relative humidity and CO2 is not necessary for our small home.
Temperature
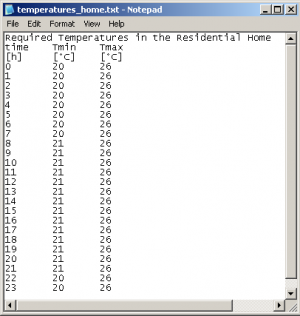
You could either enter values manually like done in the first example or use data from an external file.
Data from external needs to be loaded first. This is done in the Files/Measured Data section in the Tree.
Read the Files/Measured Data chapter on information on how to load files.
In this case a .txt file with values for minimum and maximum temperatures in the home is used. There are values for minimum and maximum temperature for every hour of the day.
First the Files/Measured Data section needs to be opened to load the file. Further input about count of header rows separators needs to be made. Then the columns must be be named and the input has to be checked. Watch the movie below to see how all of this is done.
Next "use data from an external file" has to be check-marked. A new input window pops up. Now the right columns can be selected for each minimal and maximal temperature. This, too is shown in the MOVIE.
Ventilation
There is no mechanical ventilation in the residential home, the only way air exchange is happening is through natural ventilation (opening the windows) and infiltration (air exchange through building leaks). So input the following values.
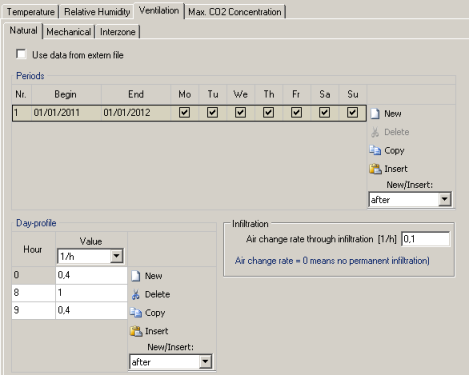
Basically we act on the assumption that there is a natural air exchange of 0,4 1/h. Between 8am and 9am there is more air exchange (1 1/h), this could be explained with inhabitants opening the windows in the morning.
Zone 2: The Fitness Studio
For the Fitness Studio it is sensible to input values values for temperature, relative humidity, ventilation and CO2 in order to create an adequate indoor climate
Temperature
The temperatures in the Fitness should be:
| time | Tmin [°C] | Tmax [°C] |
| Fitness Studio is open | 18 | 21 |
| Fitness Studio is closed | 17 | 25 |
Proceed like explained in Case1 or read the chapter on how to assign adequate periods and day profiles. Opening and closing times can be checked in section Inner Loads. Compare your inputs to those made in the
WUFI file attached below.
Relative Humidity
Relative humidity should be kept between 30 and 70 percent all over the time. So just enter these values for minimal and maximal relative humidity.
Ventilation
Natural Ventilation: The value for infiltration is 0,1 1/h in the Fitness Studio, to represent the air exchange through building leaks.
Mechanical Ventilation: During opening hours quite a lot inner loads occur, so the value for the mechanical ventilation (2 1/h) is quite high. When the Studio is closed, no mechanical ventilation is requested. The ventilation is controlled by CO2, as there is a maximum CO2 value that mustn't be exceeded (see CO2 section below).
Compare your own inputs to those in the attached WUFI file.
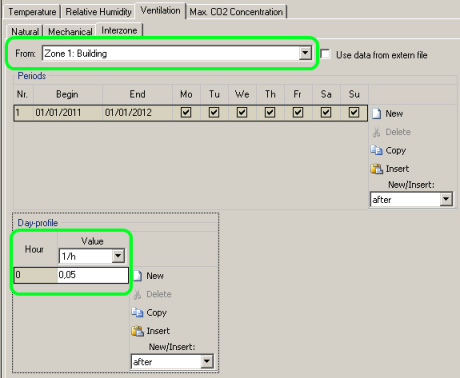
Interzone: In the Interzone subsection air interchange between the respective heated zones and other zones can be considered. We assume a air interchange of 0,05 1/h between the two heated zones through a door separating the two zones.
Your input should therefore look like this:
CO2
CO2 concentration should not exceed 1500ppm in the Fitness Studio.
Other Parameters (STEP nine)
The other parameters remain untouched for this case. To learn more about their meaning read the chapter on "Other Parameters".
HVAC (STEP ten)
In Design Conditions a schedule for the HVAC (heating, ventilating, air conditioning) systems was created but of course these facilities need capacities assigned as well. So first generate the adequate devices:
- Heating general
- Cooling general
- Humidification general
- Dehumidification general
- Mechanical ventilation general
Next their capacities need to be apportioned between the two heated zones. The result of sum of the shares must be 100 percent, of course.
Heating and cooling are distributed are assigned to the Residential Home with 65 percent and 35 percent of their capacity goes to the Fitness Studio because of the different net volumes of the two zones.
There are no humidification, dehumidification and ventilation planned for the home, so the complete capacity of these facilities is moved to the Fitness Studio.
Next assign capacities to the system.
- Heating: 80 kW
- Cooling:80 kW
- Humidification: A maximal value of 5 kg/h is assumed.
- Dehumidification: We dimension the maximal capacity with 5 kg/h for the dehumidification
- Ventilation: An air exchange rate of 2 1/h is scheduled for the Studio, therefore make sure the system can meet your demand. The volume of the studio is 119.25 m³, therefore the smallest possible value is 238,5 m³/h (=2*119,25). We assume 300 m³/h and a heat recovery of 75 percent.
Watch the MOVIE to see how all of this is done.
Results
Before starting to work with the results of the second example read the results chapter for a comprehensive summary.
Now try to complete the following tasks. If you are stuck, just watch the movies to see how everything is done.
- Create a new page with one graph on it. Insert both inner temperature of Zone 1 and 2 into it. Make sure the axes of the graph have the right scale and that everything is labeled the right way. MOVIE
- Create a text and an excel file containing values of solar gains of Zone 1 and 2. The text file shall have a heading and date/time and time (ascending) shall be attached while none of this shall be attached in the excel file. MOVIE
- Compare the results you got for the exterior walls and the partition wall. Remember results were retained for the exterior walls but not for the partition wall. MOVIE