Plus 2.X:3D-Objects: Unterschied zwischen den Versionen
Krizzl (Diskussion | Beiträge) Keine Bearbeitungszusammenfassung |
Krizzl (Diskussion | Beiträge) Keine Bearbeitungszusammenfassung |
||
| Zeile 9: | Zeile 9: | ||
The whole input mask looks like this: | The whole input mask looks like this: | ||
[[Bild:P2-thermalbridge2.png]] | |||
<br style="clear:both" /> | |||
The first step is inputting the right measures along x, y, and z axis, this is done in this part of the input mask. [[Bild:P2.thermalbridge4.png|right]] | |||
The first step is inputting the right measures along x, y, and z axis, this is done in the input mask | For each change of material, a new division must be created and dimensioned. This can be done by using the "New", "Delete", "Copy" and "Insert" button. According to Figure 1, input should look like this:<br style="clear:both" /> | ||
For each change of material, a new division must be created and dimensioned. This can be done by using the "New", "Delete", "Copy" and "Insert" button. According to Figure 1, input should look like this:<br> | |||
[[Bild:P2-thermalbridge3.png|frame|center|Figure 3: Measurement-Input]] | [[Bild:P2-thermalbridge3.png|frame|center|Figure 3: Measurement-Input]] | ||
<br style="clear:both" /> | <br style="clear:both" /> | ||
The second step is to assign the right materials and boundary conditions | The second step is to assign the right materials and boundary conditions. First, requested materials need to be selected from the database using the "Add" button. In this case brick and concrete is chosen (see Figure 1). | ||
[[Bild:P2-thermalbridge5.png]] | |||
In principle to assign a material or boundary condition to the right element, choose the division, select the material or boundary condition and click onto the element. | |||
If this is done in the x-axis tab, the procedure is the following: | |||
[[Bild:P2-thermalbridgeX.png]] | |||
*Imagine you look at the 3D-Element in direction of the green arrow in the picture. | |||
*It is started with the uppermost division, the Boundary Condition (B. Cond.)[1]. On this side the element touches the outer air, so "climate" [2] is selected and then it is clicked onto the elements you see in the picture below. [3] | |||
They turn blue and the outer climate is assigned to the outside-boundary condition area now. | |||
[[Bild:P2-thermalbridgeX2.png]] | |||
*Next the seceond division is selected the second division, this is section 1 in the | |||
picture above. Obviously the whole area is brick, so brick is selected and then assigned to the elements by clicking onto them. The outer elements remain untouched, they are adiabat, there is no heat exchange happening through them as they are only the continuance of the walls. [[Bild:P2-thermalbridgeX3.png]] | |||
*After that, the third division is chosen, this is area 2 in the | |||
picture. This "slice" of the wall has both a brick and a concrete part. The outer parts are brick, the inner one is concrete. [[Bild:P2-thermalbridgeX4.png]] | |||
*The fourth division (area 3 in the | |||
picture) gets concrete assigned to its middle part and as the two outer areas are inner air, they belong to "Zone 1:Heated Zone" | |||
[[Bild:P2-thermalbridgeX5.png]] | |||
*Last the fifth division remains untouched, it's adiabat. | |||
Version vom 29. März 2012, 13:29 Uhr
WUFI plus offers the possibility to model 3D thermal bridges. In this chapter the procedure is explained using the easy example you can see in the picture below.

A new 3D Object can be created by clicking on the "New" button in the 3D Objects section. The newly created Object appears in the Navigation Tree and can be edited then.
The whole input mask looks like this:

The first step is inputting the right measures along x, y, and z axis, this is done in this part of the input mask.
For each change of material, a new division must be created and dimensioned. This can be done by using the "New", "Delete", "Copy" and "Insert" button. According to Figure 1, input should look like this:

The second step is to assign the right materials and boundary conditions. First, requested materials need to be selected from the database using the "Add" button. In this case brick and concrete is chosen (see Figure 1).

In principle to assign a material or boundary condition to the right element, choose the division, select the material or boundary condition and click onto the element.
If this is done in the x-axis tab, the procedure is the following:

- Imagine you look at the 3D-Element in direction of the green arrow in the picture.
- It is started with the uppermost division, the Boundary Condition (B. Cond.)[1]. On this side the element touches the outer air, so "climate" [2] is selected and then it is clicked onto the elements you see in the picture below. [3]
They turn blue and the outer climate is assigned to the outside-boundary condition area now.

- Next the seceond division is selected the second division, this is section 1 in the
picture above. Obviously the whole area is brick, so brick is selected and then assigned to the elements by clicking onto them. The outer elements remain untouched, they are adiabat, there is no heat exchange happening through them as they are only the continuance of the walls. 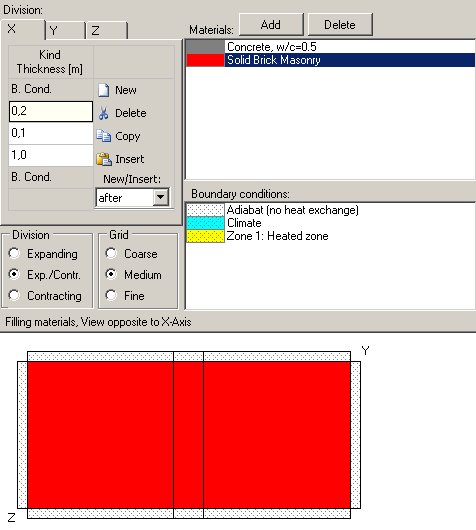

- After that, the third division is chosen, this is area 2 in the
picture. This "slice" of the wall has both a brick and a concrete part. The outer parts are brick, the inner one is concrete. 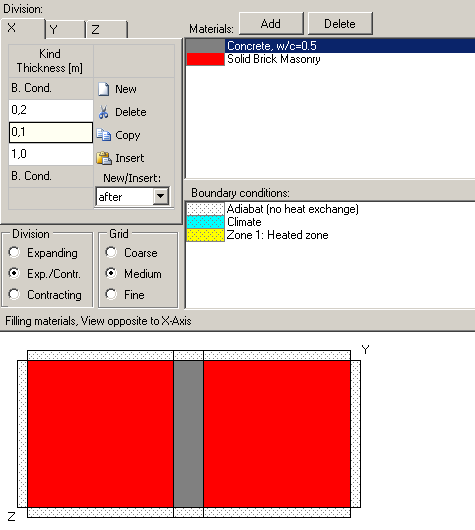

- The fourth division (area 3 in the
picture) gets concrete assigned to its middle part and as the two outer areas are inner air, they belong to "Zone 1:Heated Zone"

- Last the fifth division remains untouched, it's adiabat.