1D:Dialog FilmProperties: Unterschied zwischen den Versionen

Aus Wufiwiki
Zur Navigation springenZur Suche springen
Keine Bearbeitungszusammenfassung
 
(2 dazwischenliegende Versionen desselben Benutzers werden nicht angezeigt)
Zeile 16: Zeile 16:
<TR><TD WIDTH="10">&nbsp;</TD>
     <TD><B>&quot;Title&quot;:</B><BR>
     <TD><B>&quot;Title&quot;:</B><BR>
        Enter a title that will be displayed above the component in the
Enter a title that will be displayed above the component in the [[1D:Dialog_RunCalculationWithFilm | film]].<BR>
        [[1D:Dialog_RunCalculationWithFilm | film]].<BR>
&nbsp;<BR>
        &nbsp;<BR>
     </TD>
     </TD>
</TR>
</TR>
Zeile 24: Zeile 23:
<TR><TD>&nbsp;</TD>
<TR><TD>&nbsp;</TD>
     <TD><B>&quot;Layout&quot;:</B><BR>
     <TD><B>&quot;Layout&quot;:</B><BR>
        &nbsp;<BR>
&nbsp;<BR>
     </TD>
     </TD>


Zeile 33: Zeile 32:
     <TR><TD WIDTH="10">&nbsp;</TD>
     <TR><TD WIDTH="10">&nbsp;</TD>
         <TD><B>&quot;Picture of component&quot;:</B><BR>
         <TD><B>&quot;Picture of component&quot;:</B><BR>
            Check this option to tint the graphical display of the
Check this option to tint the graphical display of the [[1D:Dialog_Assembly | component]] with the [[1D:Dialog_MaterialData | colors]] specified for the individual layers. The slide bar <B>&quot;Picture Lightness&quot;</B> adjusts the color saturation.<BR>
            [[1D:Dialog_Assembly | component]] with the
&nbsp;<BR>
            [[1D:Dialog_MaterialData | colors]] specified for
            the individual layers. The slide bar
            <B>&quot;Picture Lightness&quot;</B>
            adjusts the color saturation.<BR>
            &nbsp;<BR>
         </TD>
         </TD>
     </TR>
     </TR>
     <TR><TD>&nbsp;</TD>
     <TR><TD>&nbsp;</TD>
         <TD><B>&quot;Show calendar&quot;:</B><BR>
         <TD><B>&quot;Show calendar&quot;:</B><BR>
            You may show or hide clock and calendar.<BR>
You may show or hide clock and calendar.<BR>
            &nbsp;<BR>
&nbsp;<BR>
         </TD>
         </TD>
     </TR>
     </TR>
     <TR><TD>&nbsp;</TD>
     <TR><TD>&nbsp;</TD>
         <TD><B>&quot;Display absolute years&quot;:</B><BR>
         <TD><B>&quot;Display absolute years&quot;:</B><BR>
            Uncheck this option to display the years in the calendar as a
Uncheck this option to display the years in the calendar as a relative count &quot;1, 2, 3,...&quot;, even if you have entered specific years for the [[1D:Dialog_Time | calculation period]] (e.g. from 2004 to 2012).<BR>
            relative count &quot;1, 2, 3,...&quot;, even if you have entered
&nbsp;<BR>
            specific years for the
            [[1D:Dialog_Time | calculation period]]
            (e.g. from 2004 to 2012).<BR>
            &nbsp;<BR>
         </TD>
         </TD>
     </TR>
     </TR>
     <TR><TD>&nbsp;</TD>
     <TR><TD>&nbsp;</TD>
         <TD><B>&quot;Show radiation/rain&quot;:</B><BR>
         <TD><B>&quot;Show radiation/rain&quot;:</B><BR>
            Show or hide the bar indicators for solar radiation and rain.<BR>
Show or hide the bar indicators for solar radiation and rain.<BR>
            &nbsp;<BR>
&nbsp;<BR>
         </TD>
         </TD>
     </TR>
     </TR>
     <TR><TD>&nbsp;</TD>
     <TR><TD>&nbsp;</TD>
         <TD><B>&quot;Show layer description&quot;:</B><BR>
         <TD><B>&quot;Show layer description&quot;:</B><BR>
            Show the [[1D:Dialog_Assembly | material name]] below each layer
Show the [[1D:Dialog_Assembly | material name]] below each layer of the graphical component display, or hide it.<BR>
            of the graphical component display, or hide it.<BR>
&nbsp;<BR>
            &nbsp;<BR>
         </TD>
         </TD>
     </TR>
     </TR>
     <TR><TD>&nbsp;</TD>
     <TR><TD>&nbsp;</TD>
         <TD><B>&quot;Show layer thickness&quot;:</B><BR>
         <TD><B>&quot;Show layer thickness&quot;:</B><BR>
            Show the [[1D:Dialog_Assembly | layer thickness]] below each
Show the [[1D:Dialog_Assembly | layer thickness]] below each layer of the graphical component display, or hide it.<BR>
            layer of the graphical component display, or hide it.<BR>
&nbsp;<BR>
            &nbsp;<BR>
         </TD>
         </TD>
     </TR>
     </TR>
     <TR><TD>&nbsp;</TD>
     <TR><TD>&nbsp;</TD>
         <TD><B>&quot;Element grid&quot;:</B><BR>
         <TD><B>&quot;Element grid&quot;:</B><BR>
            Show or hide the [[1D:Dialog_Assembly | numerical grid]].<BR>
Show or hide the [[1D:Dialog_Assembly | numerical grid]].<BR>
            &nbsp;<BR>
&nbsp;<BR>
         </TD>
         </TD>
     </TR>
     </TR>
     <TR><TD>&nbsp;</TD>
     <TR><TD>&nbsp;</TD>
         <TD><B>&quot;Font size&quot;:</B><BR>
         <TD><B>&quot;Font size&quot;:</B><BR>
            Adjust the size of the font used in the graphical display.<BR>
Adjust the size of the font used in the graphical display.<BR>
            &nbsp;<BR>
&nbsp;<BR>
         </TD>
         </TD>
     </TR>
     </TR>
Zeile 97: Zeile 85:
<TR><TD>&nbsp;</TD>
<TR><TD>&nbsp;</TD>
     <TD><B>&quot;X-Scale [cm]&quot;:</B><BR>
     <TD><B>&quot;X-Scale [cm]&quot;:</B><BR>
        You may specify a scale for the x-axis or rely on WUFI's automatic scaling.<BR>
You may specify a scale for the x-axis or rely on WUFI's automatic scaling.<BR>
        &nbsp;<BR>
&nbsp;<BR>
     </TD>
     </TD>
</TR>
</TR>
<TR><TD>&nbsp;</TD>
<TR><TD>&nbsp;</TD>
     <TD><B>&quot;Unit system&quot;:</B><BR>
     <TD><B>&quot;Unit system&quot;:</B><BR>
        You can switch between SI and IP units.<BR>
You can switch between SI and IP units.<BR>
        &nbsp;<BR>
&nbsp;<BR>
     </TD>
     </TD>
</TR>
</TR>
Zeile 110: Zeile 98:
<TR><TD>&nbsp;</TD>
<TR><TD>&nbsp;</TD>
     <TD><B>&quot;Size&quot;:</B><BR>
     <TD><B>&quot;Size&quot;:</B><BR>
        You can specify the size of the film window in pixels.<BR>
You can specify the size of the film window in pixels.<BR>
        &nbsp;<BR>
&nbsp;<BR>
     </TD>
     </TD>
</TR>
</TR>
Zeile 126: Zeile 114:
<TR><TD WIDTH="10">&nbsp;</TD>
     <TD><B>&quot;Show traces&quot;:</B><BR>
     <TD><B>&quot;Show traces&quot;:</B><BR>
        Check this option in order to tint the area swept by the curves. This is
Check this option in order to tint the area swept by the curves. This is useful for a quick overview of the extremal values that have occured at each loction of the component.<BR>
        useful for a quick overview of the extremal values that have occured at
&nbsp;<BR>
        each loction of the component.<BR>
        &nbsp;<BR>
     </TD>
     </TD>
</TR>
</TR>
<TR><TD>&nbsp;</TD>
<TR><TD>&nbsp;</TD>
     <TD><B>&quot;Scale [&deg;C]:&quot;</B><BR>
     <TD><B>&quot;Scale [&deg;C]:&quot;</B><BR>
        You may specify a scale for the y-axis or rely on WUFI's automatic scaling.<BR>
You may specify a scale for the y-axis or rely on WUFI's automatic scaling.<BR>
        &nbsp;<BR>
&nbsp;<BR>
     </TD>
     </TD>
</TR>
</TR>
<TR><TD>&nbsp;</TD>
<TR><TD>&nbsp;</TD>
     <TD><B>&quot;Temperature&quot;:</B><BR>
     <TD><B>&quot;Temperature&quot;:</B><BR>
        &nbsp;<BR>
&nbsp;<BR>
     </TD>
     </TD>
</TR>
</TR>
Zeile 149: Zeile 135:
     <TR><TD WIDTH="10">&nbsp;</TD>
     <TR><TD WIDTH="10">&nbsp;</TD>
         <TD><B>&quot;Visible&quot;:</B><BR>
         <TD><B>&quot;Visible&quot;:</B><BR>
            Switch display of the temperature curve on or off.<BR>
Switch display of the temperature curve on or off.<BR>
            &nbsp;<BR>
&nbsp;<BR>
         </TD>
         </TD>
     </TR>
     </TR>
     <TR><TD>&nbsp;</TD>
     <TR><TD>&nbsp;</TD>
         <TD><B>&quot;Colors&quot;:</B><BR>
         <TD><B>&quot;Colors&quot;:</B><BR>
            Select the colors for the temperature curve and its traces.<BR>
Select the colors for the temperature curve and its traces.<BR>
            &nbsp;<BR>
&nbsp;<BR>
         </TD>
         </TD>
     </TR>
     </TR>
     <TR><TD>&nbsp;</TD>
     <TR><TD>&nbsp;</TD>
         <TD><B>&quot;Heat flux&quot;:</B><BR>
         <TD><B>&quot;Heat flux&quot;:</B><BR>
            &nbsp;<BR>
&nbsp;<BR>
         </TD>
         </TD>
     </TR>
     </TR>
Zeile 170: Zeile 156:
             <TR><TD WIDTH="10">&nbsp;</TD>
             <TR><TD WIDTH="10">&nbsp;</TD>
                 <TD><B>&quot;Visible&quot;:</B><BR>
                 <TD><B>&quot;Visible&quot;:</B><BR>
                    Switch the heat flux arrows above the graphical component
Switch the heat flux arrows above the graphical component display on or off.<BR>
                    display on or off.<BR>
&nbsp;<BR>
                    &nbsp;<BR>
                 </TD>
                 </TD>
             </TR>
             </TR>
             <TR><TD>&nbsp;</TD>
             <TR><TD>&nbsp;</TD>
                 <TD><B>&quot;Logarithmic&quot;:</B><BR>
                 <TD><B>&quot;Logarithmic&quot;:</B><BR>
                    If the heat fluxes are very different, the linear display only
If the heat fluxes are very different, the linear display only shows the largest arrows. The logarithmic display softens the differences.<BR>
                    shows the largest arrows. The logarithmic display softens the
&nbsp;<BR>
                    differences.<BR>
                    &nbsp;<BR>
                 </TD>
                 </TD>
             </TR>
             </TR>
             <TR><TD>&nbsp;</TD>
             <TR><TD>&nbsp;</TD>
                 <TD><B>&quot;Time step maximum&quot;,</B><BR>
                 <TD><B>&quot;Time step maximum&quot;,</B><BR>
                    <B>&quot;Global maximum&quot;:</B><BR>
<B>&quot;Global maximum&quot;:</B><BR>
                    Since the intensity of the fluxes within the component may vary
Since the intensity of the fluxes within the component may vary over several orders of magnitude, it is not possible to predefine an all-purpose length scale for the flux arrows.<BR>
                    over several orders of magnitude, it is not possible to predefine
&nbsp;<BR>
                    an all-purpose length scale for the flux arrows.<BR>
The option <B>&quot;Time step maximum&quot;</B> scales the maximum arrow length to the largest flux value occurring at the current time step (i.e. at every time step there is always at least one arrow that has maximum length).<BR>
                    &nbsp;<BR>
&nbsp;<BR>
                    The option <B>&quot;Time step maximum&quot;</B> scales the maximum
The option <B>&quot;Global maximum&quot;</B> scales the maximum arrow length to the largest flux value that has occurred in the component so far.<BR>
                    arrow length to the largest flux value occurring at the current
&nbsp;<BR>
                    time step (i.e. at every time step there is always at least one
The option &quot;global&quot; allows to compare fluxes at different times (unless occurrence of a new maximum flux requires a rescaling), but after a large flux has occurred, small fluxes may be displayed by such small arrows that they are hardly recognizable. The option <B>&quot;time step&quot;</B> always adapts the scale length to the current processes in the component.<BR>
                    arrow that has maximum length).<BR>
&nbsp;<BR>
                    &nbsp;<BR>
                    The option <B>&quot;Global maximum&quot;</B> scales the maximum
                    arrow length to the largest flux value that has occurred in the
                    component so far.<BR>
                    &nbsp;<BR>
                    The option &quot;global&quot; allows to compare fluxes at different
                    times (unless occurrence of a new maximum flux requires a rescaling),
                    but after a large flux has occurred, small fluxes may be displayed
                    by such small arrows that they are hardly recognizable. The option
                    <B>&quot;time step&quot;</B> always adapts the scale length to the
                    current processes in the component.<BR>
                    &nbsp;<BR>
                 </TD>
                 </TD>
             </TR>
             </TR>
Zeile 219: Zeile 190:
<TR><TD>&nbsp;</TD>
<TR><TD>&nbsp;</TD>
     <TD><B>&quot;Dew point&quot;:</B><BR>
     <TD><B>&quot;Dew point&quot;:</B><BR>
        &nbsp;<BR>
&nbsp;<BR>
        [[Bild:DialogEinstellungenFilm_C_2.gif]]<BR>
[[Bild:DialogEinstellungenFilm_C_2.gif]]<BR>
        &nbsp;<BR>
&nbsp;<BR>
     </TD>
     </TD>
</TR>
</TR>
Zeile 230: Zeile 201:
     <TR><TD WIDTH="10">&nbsp;</TD>
     <TR><TD WIDTH="10">&nbsp;</TD>
         <TD><B>&quot;Visible&quot;:</B><BR>
         <TD><B>&quot;Visible&quot;:</B><BR>
            Switch display of the dew point curve on or off.<BR>
Switch display of the dew point curve on or off.<BR>
            &nbsp;<BR>
&nbsp;<BR>
         </TD>
         </TD>
     </TR>
     </TR>
     <TR><TD>&nbsp;</TD>
     <TR><TD>&nbsp;</TD>
         <TD><B>&quot;Colors&quot;:</B><BR>
         <TD><B>&quot;Colors&quot;:</B><BR>
            Select the colors for the dew point curve and its traces.<BR>
Select the colors for the dew point curve and its traces.<BR>
            &nbsp;<BR>
&nbsp;<BR>
         </TD>
         </TD>
     </TR>
     </TR>
Zeile 256: Zeile 227:
<TR><TD WIDTH="10">&nbsp;</TD>
     <TD><B>&quot;Show traces&quot;:</B><BR>
     <TD><B>&quot;Show traces&quot;:</B><BR>
        Check this option in order to tint the area swept by the curves. This
Check this option in order to tint the area swept by the curves. This is useful for a quick overview of the extremal values that have occured at each loction of the component.<BR>
        is useful for a quick overview of the extremal values that have occured
&nbsp;<BR>
        at each loction of the component.<BR>
        &nbsp;<BR>
     </TD>
     </TD>
</TR>
</TR>
<TR><TD>&nbsp;</TD>
<TR><TD>&nbsp;</TD>
     <TD><B>&quot;Water content&quot;:</B><BR>
     <TD><B>&quot;Water content&quot;:</B><BR>
        &nbsp;<BR>
&nbsp;<BR>
     </TD>
     </TD>
</TR>
</TR>
Zeile 273: Zeile 242:
         <TR><TD WIDTH="10">&nbsp;</TD>
         <TR><TD WIDTH="10">&nbsp;</TD>
             <TD><B>&quot;Visible&quot;:</B><BR>
             <TD><B>&quot;Visible&quot;:</B><BR>
                Switch display of the water content curve on or off.<BR>
Switch display of the water content curve on or off.<BR>
                &nbsp;<BR>
&nbsp;<BR>
             </TD>
             </TD>
         </TR>
         </TR>
         <TR><TD>&nbsp;</TD>
         <TR><TD>&nbsp;</TD>
             <TD><B>&quot;Colors&quot;:</B><BR>
             <TD><B>&quot;Colors&quot;:</B><BR>
                Select the colors for the water content curve and its traces.<BR>
Select the colors for the water content curve and its traces.<BR>
                &nbsp;<BR>
&nbsp;<BR>
             </TD>
             </TD>
         </TR>
         </TR>
         <TR><TD>&nbsp;</TD>
         <TR><TD>&nbsp;</TD>
             <TD><B>&quot;Moisture flux&quot;:</B><BR>
             <TD><B>&quot;Moisture flux&quot;:</B><BR>
                &nbsp;<BR>
&nbsp;<BR>
             </TD>
             </TD>
         </TR>
         </TR>
Zeile 294: Zeile 263:
                 <TR><TD WIDTH="10">&nbsp;</TD>
                 <TR><TD WIDTH="10">&nbsp;</TD>
                     <TD><B>&quot;Visible&quot;:</B><BR>
                     <TD><B>&quot;Visible&quot;:</B><BR>
                        Switch the moisture flux arrows above the graphical component
Switch the moisture flux arrows above the graphical component display on or off.<BR>
                        display on or off.<BR>
&nbsp;<BR>
                        &nbsp;<BR>
                     </TD>
                     </TD>
                 </TR>
                 </TR>
                 <TR><TD>&nbsp;</TD>
                 <TR><TD>&nbsp;</TD>
                     <TD><B>&quot;Logarithmic&quot;:</B><BR>
                     <TD><B>&quot;Logarithmic&quot;:</B><BR>
                        If the moisture fluxes are very different, the linear display
If the moisture fluxes are very different, the linear display only shows the largest arrows. The logarithmic display softens the differences.<BR>
                        only shows the largest arrows. The logarithmic display softens
&nbsp;<BR>
                        the differences.<BR>
                        &nbsp;<BR>
                     </TD>
                     </TD>
                 </TR>
                 </TR>
                 <TR><TD>&nbsp;</TD>
                 <TR><TD>&nbsp;</TD>
                     <TD><B>&quot;Time step maximum&quot;,</B><BR>
                     <TD><B>&quot;Time step maximum&quot;,</B><BR>
                        <B>&quot;Global maximum&quot;:</B><BR>
<B>&quot;Global maximum&quot;:</B><BR>
                        Since the intensity of the fluxes within the component may vary
Since the intensity of the fluxes within the component may vary over several orders of magnitude, it is not possible to predefine an all-purpose length scale for the flux arrows.<BR>
                        over several orders of magnitude, it is not possible to predefine
&nbsp;<BR>
                        an all-purpose length scale for the flux arrows.<BR>
The option <B>&quot;Time step maximum&quot;</B> scales the maximum arrow length to the largest flux value occurring at the current time step (i.e. at every time step there is always at least one arrow that has maximum length).<BR>
                        &nbsp;<BR>
&nbsp;<BR>  
                        The option <B>&quot;Time step maximum&quot;</B> scales the
The option <B>&quot;Global maximum&quot;</B> scales the maximum arrow length to the largest flux value that has occurred in the component so far.<BR>
                        maximum arrow length to the largest flux value occurring at
&nbsp;<BR>
                        the current time step (i.e. at every time step there is always
The option &quot;global&quot; allows to compare fluxes at different times (unless occurrence of a new maximum flux requires a rescaling), but after a large flux has occurred, small fluxes may be displayed by such small arrows that they are hardly recognizable. The option &quot;time step&quot; always adapts the scale length to the current processes in the component.<BR>
                        at least one arrow that has maximum length).<BR>
&nbsp;<BR>
                        &nbsp;<BR>  
                        The option <B>&quot;Global maximum&quot;</B> scales the maximum
                        arrow length to the largest flux value that has occurred in
                        the component so far.<BR>
                        &nbsp;<BR>
                        The option &quot;global&quot; allows to compare fluxes at
                        different times (unless occurrence of a new maximum flux
                        requires a rescaling), but after a large flux has occurred,
                        small fluxes may be displayed by such small arrows that they
                        are hardly recognizable. The option &quot;time step&quot;
                        always adapts the scale length to the current processes in
                        the component.<BR>
                        &nbsp;<BR>
                     </TD>
                     </TD>
                 </TR>
                 </TR>
Zeile 339: Zeile 292:
         <TR><TD>&nbsp;</TD>
         <TR><TD>&nbsp;</TD>
             <TD><B>&quot;Scale [kg/m&sup3;]&quot;:</B><BR>
             <TD><B>&quot;Scale [kg/m&sup3;]&quot;:</B><BR>
                You may specify a scale for the y-axis or rely on WUFI's automatic
You may specify a scale for the y-axis or rely on WUFI's automatic scaling.<BR>
                scaling.<BR>
&nbsp;<BR>
                &nbsp;<BR>
             </TD>
             </TD>
         </TR>
         </TR>
         <TR><TD>&nbsp;</TD>
         <TR><TD>&nbsp;</TD>
             <TD><B>&quot;Display&quot;:</B><BR>
             <TD><B>&quot;Display&quot;:</B><BR>
                You can have the water content displayed in units of kg/m&sup3;
You can have the water content displayed in units of kg/m&sup3; or in mass-percent.<BR>
                or in mass-percent.<BR>
&nbsp;<BR>
                &nbsp;<BR>
             </TD>
             </TD>
         </TR>
         </TR>
Zeile 357: Zeile 308:
<TR><TD>&nbsp;</TD>
<TR><TD>&nbsp;</TD>
     <TD><B>&quot;Humidity&quot;:</B><BR>
     <TD><B>&quot;Humidity&quot;:</B><BR>
        &nbsp;<BR>
&nbsp;<BR>
        [[Bild:DialogEinstellungenFilm_E_2.gif]]<BR>
[[Bild:DialogEinstellungenFilm_E_2.gif]]<BR>
        &nbsp;<BR>
&nbsp;<BR>
     </TD>
     </TD>
</TR>
</TR>
Zeile 368: Zeile 319:
         <TR><TD WIDTH="10">&nbsp;</TD>
         <TR><TD WIDTH="10">&nbsp;</TD>
             <TD><B>&quot;Visible&quot;:</B><BR>
             <TD><B>&quot;Visible&quot;:</B><BR>
                Switch display of the relative humidity curve on or off.<BR>
Switch display of the relative humidity curve on or off.<BR>
                &nbsp;<BR>
&nbsp;<BR>
             </TD>
             </TD>
         </TR>
         </TR>
         <TR><TD>&nbsp;</TD>
         <TR><TD>&nbsp;</TD>
             <TD><B>&quot;Colors&quot;:</B><BR>
             <TD><B>&quot;Colors&quot;:</B><BR>
                Select the colors for the relative humidity curve and its traces.<BR>
Select the colors for the relative humidity curve and its traces.<BR>
                &nbsp;<BR>
&nbsp;<BR>
             </TD>
             </TD>
         </TR>
         </TR>
         <TR><TD>&nbsp;</TD>
         <TR><TD>&nbsp;</TD>
             <TD><B>&quot;Scale [%]&quot;:</B><BR>
             <TD><B>&quot;Scale [%]&quot;:</B><BR>
                You may specify a scale for the y-axis or rely on WUFI's automatic
You may specify a scale for the y-axis or rely on WUFI's automatic scaling.<BR>
                scaling.<BR>
&nbsp;<BR>
                &nbsp;<BR>
             </TD>
             </TD>
         </TR>
         </TR>
         <TR><TD>&nbsp;</TD>
         <TR><TD>&nbsp;</TD>
             <TD><B>&quot;Display&quot;:</B><BR>
             <TD><B>&quot;Display&quot;:</B><BR>
                You can select either the relative humidity or the vapor pressure
You can select either the relative humidity or the vapor pressure for display.<BR>
                for display.<BR>
&nbsp;<BR>
                &nbsp;<BR>
             </TD>
             </TD>
         </TR>
         </TR>

Aktuelle Version vom 16. September 2008, 19:22 Uhr

Dialog: Film: Properties

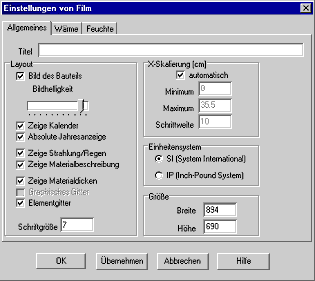
This subdialog serves to customize the film display.

"General":

EinstellungenFilm A 2.gif

  "Title":

Enter a title that will be displayed above the component in the film.
 

  "Layout":


  "Picture of component":

Check this option to tint the graphical display of the component with the colors specified for the individual layers. The slide bar "Picture Lightness" adjusts the color saturation.
 

  "Show calendar":

You may show or hide clock and calendar.
 

  "Display absolute years":

Uncheck this option to display the years in the calendar as a relative count "1, 2, 3,...", even if you have entered specific years for the calculation period (e.g. from 2004 to 2012).
 

  "Show radiation/rain":

Show or hide the bar indicators for solar radiation and rain.
 

  "Show layer description":

Show the material name below each layer of the graphical component display, or hide it.
 

  "Show layer thickness":

Show the layer thickness below each layer of the graphical component display, or hide it.
 

  "Element grid":

Show or hide the numerical grid.
 

  "Font size":

Adjust the size of the font used in the graphical display.
 

  "X-Scale [cm]":

You may specify a scale for the x-axis or rely on WUFI's automatic scaling.
 

  "Unit system":

You can switch between SI and IP units.
 

  "Size":

You can specify the size of the film window in pixels.
 

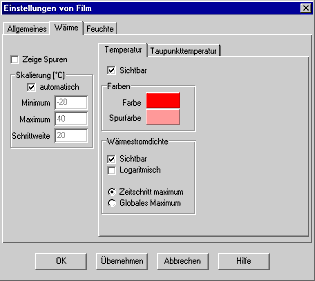
"Heat":

DialogEinstellungenFilm B 2.gif

  "Show traces":

Check this option in order to tint the area swept by the curves. This is useful for a quick overview of the extremal values that have occured at each loction of the component.
 

  "Scale [°C]:"

You may specify a scale for the y-axis or rely on WUFI's automatic scaling.
 

  "Temperature":


  "Visible":

Switch display of the temperature curve on or off.
 

  "Colors":

Select the colors for the temperature curve and its traces.
 

  "Heat flux":


  "Visible":

Switch the heat flux arrows above the graphical component display on or off.
 

  "Logarithmic":

If the heat fluxes are very different, the linear display only shows the largest arrows. The logarithmic display softens the differences.
 

  "Time step maximum",

"Global maximum":
Since the intensity of the fluxes within the component may vary over several orders of magnitude, it is not possible to predefine an all-purpose length scale for the flux arrows.
 
The option "Time step maximum" scales the maximum arrow length to the largest flux value occurring at the current time step (i.e. at every time step there is always at least one arrow that has maximum length).
 
The option "Global maximum" scales the maximum arrow length to the largest flux value that has occurred in the component so far.
 
The option "global" allows to compare fluxes at different times (unless occurrence of a new maximum flux requires a rescaling), but after a large flux has occurred, small fluxes may be displayed by such small arrows that they are hardly recognizable. The option "time step" always adapts the scale length to the current processes in the component.
 

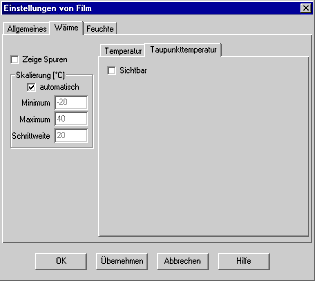
  "Dew point":

 
DialogEinstellungenFilm C 2.gif


  "Visible":

Switch display of the dew point curve on or off.
 

  "Colors":

Select the colors for the dew point curve and its traces.


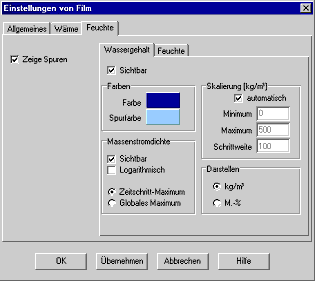
"Moisture":

DialogEinstellungenFilm D 2.gif

  "Show traces":

Check this option in order to tint the area swept by the curves. This is useful for a quick overview of the extremal values that have occured at each loction of the component.
 

  "Water content":


  "Visible":

Switch display of the water content curve on or off.
 

  "Colors":

Select the colors for the water content curve and its traces.
 

  "Moisture flux":


  "Visible":

Switch the moisture flux arrows above the graphical component display on or off.
 

  "Logarithmic":

If the moisture fluxes are very different, the linear display only shows the largest arrows. The logarithmic display softens the differences.
 

  "Time step maximum",

"Global maximum":
Since the intensity of the fluxes within the component may vary over several orders of magnitude, it is not possible to predefine an all-purpose length scale for the flux arrows.
 
The option "Time step maximum" scales the maximum arrow length to the largest flux value occurring at the current time step (i.e. at every time step there is always at least one arrow that has maximum length).
 
The option "Global maximum" scales the maximum arrow length to the largest flux value that has occurred in the component so far.
 
The option "global" allows to compare fluxes at different times (unless occurrence of a new maximum flux requires a rescaling), but after a large flux has occurred, small fluxes may be displayed by such small arrows that they are hardly recognizable. The option "time step" always adapts the scale length to the current processes in the component.
 

  "Scale [kg/m³]":

You may specify a scale for the y-axis or rely on WUFI's automatic scaling.
 

  "Display":

You can have the water content displayed in units of kg/m³ or in mass-percent.
 

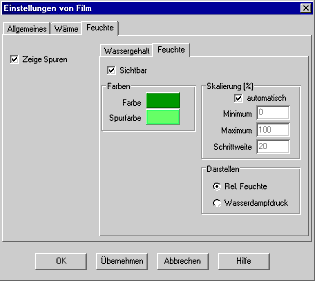
  "Humidity":

 
DialogEinstellungenFilm E 2.gif


  "Visible":

Switch display of the relative humidity curve on or off.
 

  "Colors":

Select the colors for the relative humidity curve and its traces.
 

  "Scale [%]":

You may specify a scale for the y-axis or rely on WUFI's automatic scaling.
 

  "Display":

You can select either the relative humidity or the vapor pressure for display.